
How to edit a talking head video with ChatGPT and HyperFrames
Give the editor the right footage, a complete brief and one focused review. This guide packages the decisions behind our finished Reel so you can start with them.
You take three steps. The detailed instructions below tell the editing agent how to handle cuts, captions, clicks, zooms, comparisons and a realistic Instagram comment sequence.
3 reader stepsCopyable promptsActual frames from the edit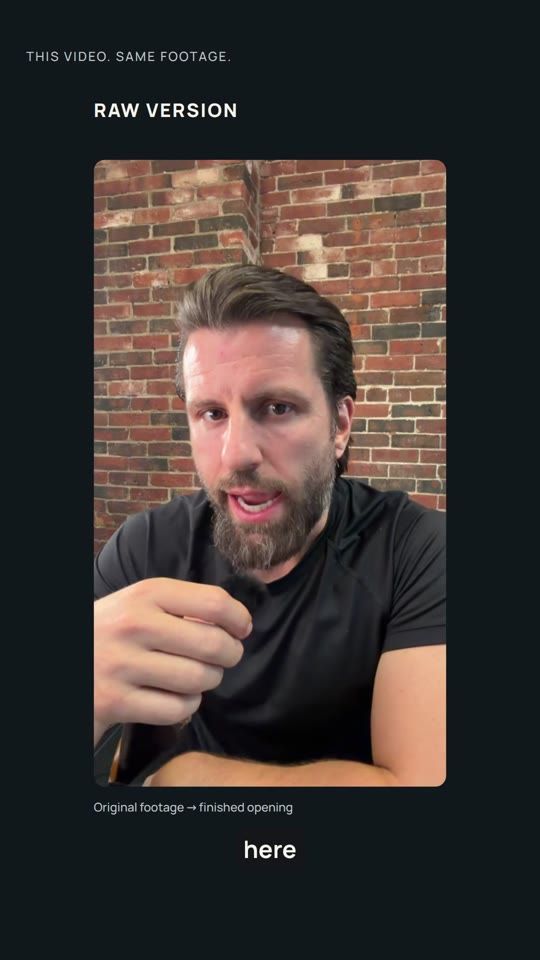
Before you start
This example was created in a file-capable coding environment with HyperFrames available. HyperFrames builds and renders the video; the agent plans and edits the composition. A chat response describing an edit is not a finished MP4.
HyperFrames is an open-source video framework that works with coding agents through installed skills. Availability depends on your environment. Ask the agent to confirm it can open your footage and render a video before you begin.
“Can you read an uploaded video, inspect its audio, use HyperFrames and export an MP4 here? Confirm what is available. If anything is missing, tell me exactly what I need to enable or install.”
If HyperFrames is not installed
In a coding-agent environment with terminal access, ask the agent to follow the official repository setup and install the core skills. The repository currently documents this non-interactive command:
npx hyperframes skills update
Then ask it to run the capability check again. If the environment cannot execute tools or render media, use a compatible coding-agent environment with access to your files. Pasting the GitHub link alone does not install the renderer.
Setup source: HyperFrames Quick Start. The example project used HyperFrames 0.8.48. Follow the current setup instructions for a new project.
Upload one clear source package
Use the original camera recording with its audio. Avoid an export that already has captions, zooms or music baked into it. Speak in complete thoughts and leave a small pause between sections so the editor has clean places to cut.
Name it RAW_SOURCE.mp4 or RAW_SOURCE.mov. If you upload a replacement, explicitly say it replaces the earlier source.
Name it REFERENCE_EDIT. Say what you like: typography, pacing, interactions or layout. It is not footage to insert.
Supply profile screenshots and screen recordings of the app actions you want to show. Include your handle and exact comment keyword.
For this video, the source was Jimmy speaking against a brick wall. That same recording had to appear in the Instagram Edits preview, the timeline thumbnails and the raw-to-edited comparison. Mixing recordings was one of the biggest avoidable mistakes.
Paste the complete editing brief
Replace the bracketed fields. Keep the production instructions. The point is to give the editor the important decisions upfront, instead of discovering them through repeated revisions.
Build your brief here
Edit these fields, then choose “Fill my prompt.” Your answers stay in this page. Nothing is sent to a server. Review the filled prompt before copying it.
Master editing prompt
Edit the attached RAW_SOURCE video into a polished vertical talking-head Reel using HyperFrames.

First confirm that you can read the video, hear or inspect its audio, run HyperFrames, and export an MP4. Use Astra if available; if unavailable, say so. Do not claim that a tool was used if it was not. If rendering is unavailable, explain the missing capability before promising a finished video.

MY BRIEF
Audience: [who should watch]
Desired action: [one action]
Opening headline: [exact words]
Instagram profile: [@handle]
Comment keyword: [keyword]
Cover headline: [exact words]
Target duration: [for example 40–55 seconds; keep complete thoughts]
Remove: [quote unwanted sentences, or say “remove repeated points and dead air”]
References: [links and attached screenshots or recordings]

SOURCE AND STORY
Use only RAW_SOURCE for my speaking footage, editor previews, timeline thumbnails and raw/edited comparison. REFERENCE_EDIT is a style reference, not source footage. Preserve my real face, expression and voice. Never generate a likeness of me. Transcribe with word timestamps. Check names and the comment keyword manually. Identify hook, problem, proof and call to action. Cut repeated explanations before adding graphics. Use natural speech boundaries; never trim a consonant or change what I mean. Track source times separately from final edit times.

VISUAL DIRECTION
Use one restrained system: warm ivory, near-black and one blue accent; one editorial headline font and one readable sans serif. Show the spoken idea. Avoid repeating the same popup on every sentence. Choose full-screen footage, a real interface cutaway or a split layout only when it explains the point.

Open immediately with the headline. If relevant to my script, pair my real footage with an upload → thinking → editing demonstration. Any interface shown editing my video must show this exact recording, including its timeline thumbnails. Use supplied real screenshots or screen recordings for interface details. If you recreate an interaction, identify it as a demonstration; do not imply that you actually posted, followed or commented.

For clicks, move the pointer to an actual control, briefly settle, click, show that control responding and synchronize a quiet click sound. When I say “zoom in,” visibly zoom my footage; when I say “zoom out,” pull back. Start around 100% → 130% → 100%, adapting the crop so my face stays in frame. Time the movement to the words, not to arbitrary beats.

If the script calls for a comparison, play a short raw moment first, then replace it in the same frame with the actual finished edit of that identical moment. Keep start point, speed and duration comparable. Do not use another recording or a made-up edited example.

On the spoken “comment [keyword] below,” pull the playing video back into an Instagram Reel on my profile. A separate viewer opens comments; the sheet and phone keyboard appear; the viewer types the keyword and taps Post; the comment appears. Match realistic spacing, icons, typing pauses and interface responses. Keep the footage moving. Finish the interaction and clear the interface before my final closing line.

CUTS AND SOUND
Inspect the speech around every cut. Use a short audio overlap only where it preserves clean words; adjust each boundary by ear or waveform. Hide a large picture jump with a relevant cutaway or matched reframe. Do not dissolve two faces together or add a loud whoosh to conceal a bad edit. Keep the closing line continuous. Use subtle effects that support visible actions. Preserve clear voice and check the final encoded audio for silence, clipping and sync.

CAPTIONS AND COVER
Burn in accurate captions, usually 3–6 words at a time, breaking at natural phrases. Use high contrast. Keep text away from the face, Instagram buttons, account details and comment sheet. Check the layout at phone size. Use the exact cover headline with no headshot or person unless I explicitly request one.

REVIEW AND DELIVERY
Before the full export, show a compact timestamped edit map and short playable previews of the opening, the roughest join and the call to action. Inspect those previews yourself first and fix obvious issues. Then ask me for one consolidated review. After approval, render the final version and verify the actual exported file, including sound. Deliver a 1080×1920 MP4 at 30fps with audible audio and burned captions, a separate cover, matching SRT captions and the complete editable HyperFrames source with local assets. Report any meaningful limitation honestly. Do not publish anything to my account.
This prompt requests a first review before the full export. It reduces wasted renders; it does not guarantee that every video will need only one revision.
Review the risky moments once
Watch the opening, the main cut and the call to action with sound. Then watch the full preview on your phone. Send one numbered message with timestamps from that exact export. Quote the spoken words when possible.
Instead of “make it smoother,” say: “At 00:34, cut to the complete ‘So I did this…’ sentence near 00:45. Keep the whole first word. Cover the picture jump with the Zoe reference and blend the audio at a clean speech boundary.”
Consolidated feedback prompt
Use the latest delivered version as the reference. Preserve everything I do not mention.

1. [00:00–00:00] Problem: [what feels wrong]. Change: [exact result].
2. [00:00–00:00] Problem: [what feels wrong]. Change: [exact result].
3. [00:00–00:00] Problem: [what feels wrong]. Change: [exact result].

These timestamps refer to the latest exported video, not the raw recording. If a requested cut clips a word, use the nearest clean speech boundary and tell me the adjusted time. Check the affected scenes in motion with audio before exporting. Retain captions, source identity and all previously approved details.
Before you approve the export
- The first frame tells viewers what they are watching.
- Every editor preview and thumbnail uses the correct recording.
- Clicks visibly change a control and the sound lands with the click.
- Zooms happen on the words that call for them.
- The comparison replays the same source moment.
- No cut loses a word or creates a sudden change in sound.
- Captions are accurate and readable on a phone.
- The comment sheet and keyboard behave like a real interface.
- The closing line is clear, continuous and free of leftover panels.
- The downloaded MP4 has voice, effects and no clipping.
Approve the full render after these checks. Ask for the MP4, cover, SRT and editable source together so you can make later changes without rebuilding the project.
A completed brief for this exact video
Use this to see the level of specificity that prevents unnecessary revisions. Keep the structure and replace the content for your own recording.
| Decision | This example |
|---|---|
| Source | The brick-wall recording of Jimmy in a black shirt holding a microphone. Use it in every preview and thumbnail. |
| Audience and action | People who dislike manual video editing. Ask them to comment AI for the workflow. |
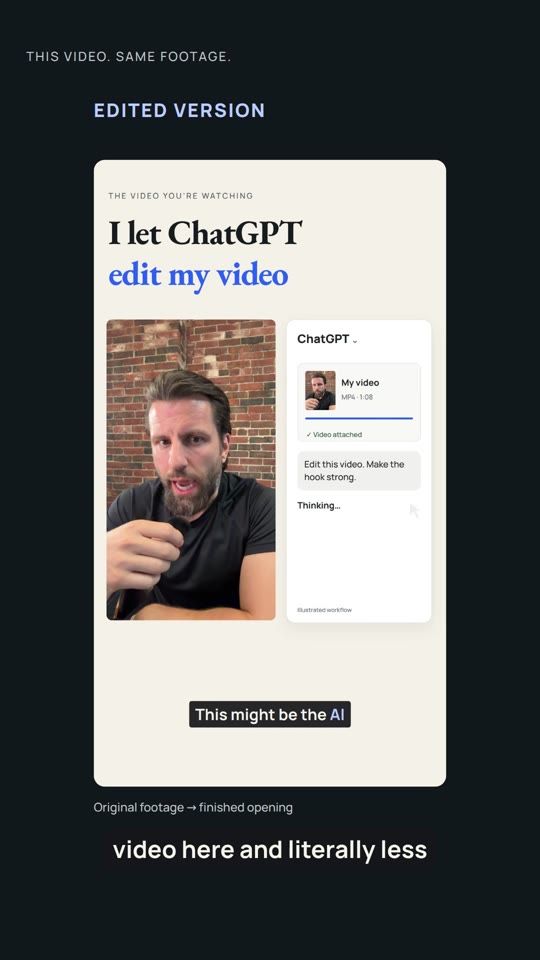
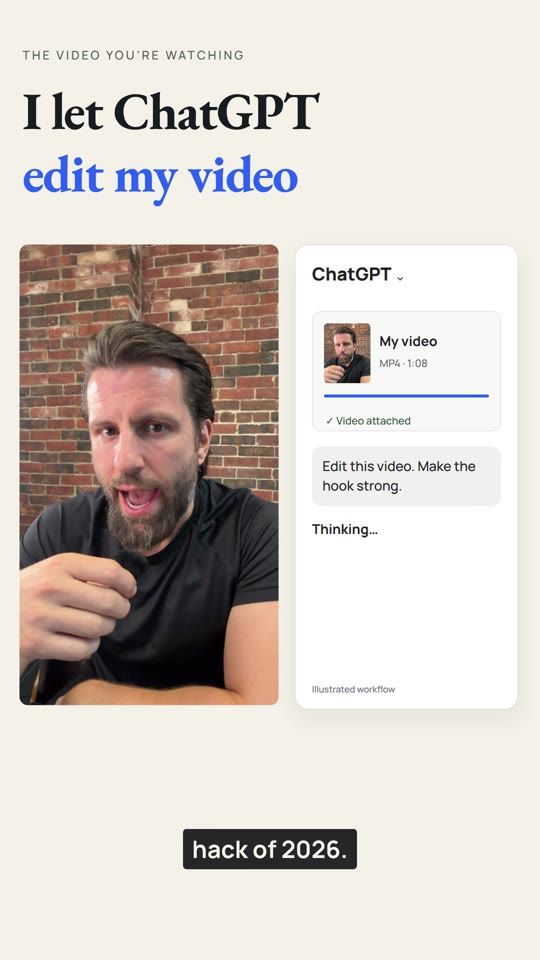
| Hook | “I let ChatGPT edit my video.” Pair the speaker with an illustrated upload and editing sequence. |
| Story | Manual editing frustration → creator and tool credit → raw versus edited proof → comment AI → short closing line. |
| Remove | The skepticism passage and the later explanation of how professional the result looks. The comparison already proves the benefit. |
| Proof | Replay the same opening moment raw first, then show the actual edited opening. Sequential replacement, not side by side. |
| Visual triggers | Mouse click means a click. Zoom in means a push into the footage. Zoom out means a return to the wider view. |
| Comment scene | Reel owner @jimmymackin. A separate viewer types AI and posts. The video continues behind the interface. |
| Cover | “Instagram Edits vs. ChatGPT.” Graphic-only, without a headshot. |
| Preserve | Real face, real voice, accurate captions, the same source clip and a continuous final sentence. |
What the reader does and what the agent does
You provide: footage, exact words for the hook and CTA, source references, your handle, and one consolidated review. The agent handles: transcription, source mapping, composition, motion, audio, captions, preview rendering and export checks. You should not need to type frame coordinates or install fonts by hand.
What to upload with the brief
- RAW_SOURCE with the original audio. State clearly which file is the source of truth.
- REFERENCE_EDIT if you have one. Add one sentence explaining what to borrow and what not to copy.
- PROFILE_REFERENCE showing the profile and Reel layout you want to reproduce. Hide private information unrelated to the demo.
- INTERACTION_REFERENCE showing the actual comment button, comment sheet, keyboard and posted state. A short screen recording is more useful than several disconnected screenshots.
- The filled prompt. Include file roles in the same message. Ask for the timestamped map and short previews before the full export.
The visual recipe behind this edit
These are actual frames from the finished 47.77-second video. The timestamps below refer to that final edit. Use the spoken phrases as triggers in your own video; do not copy these times onto a different recording.
1 Open with the result and show the action
The opening says “I let ChatGPT edit my video.” The speaker stays visible while an illustrated upload moves through attached, thinking and editing states. Each state answers a viewer’s question: what is being uploaded, what happens next and what the output will be.
2 Make the editing frustration visible
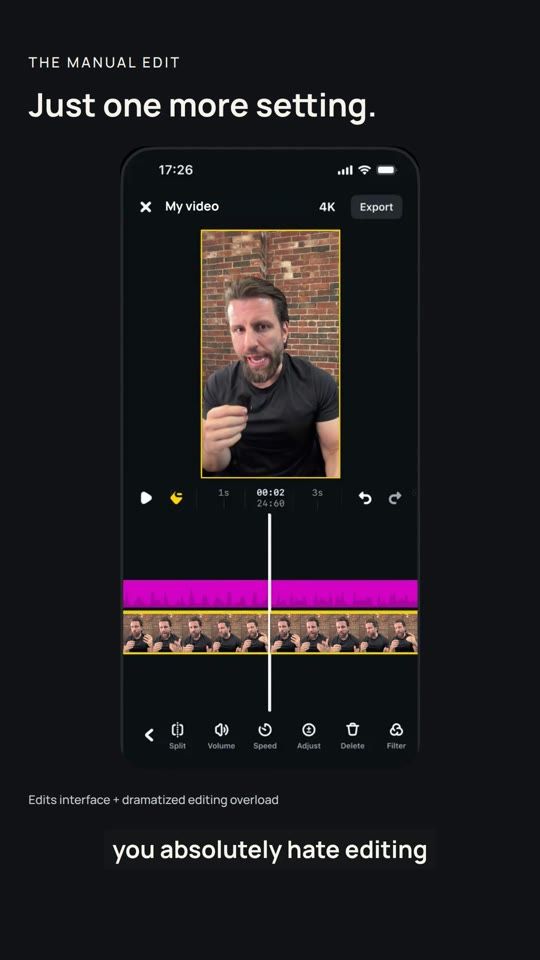
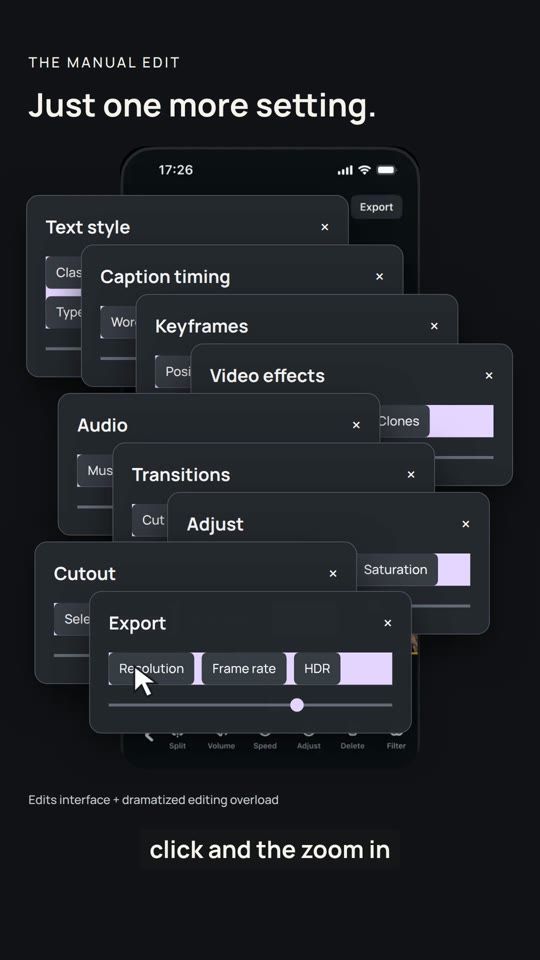
Start with the viewer and timeline readable. Then build the pile of controls one click at a time. Move the pointer to a specific control, settle briefly, press it, change its selected state and play the click on that frame. Our example restores nine cursor clicks. The number is not the goal; each click must cause a visible response.
Use the same raw video in both the preview and the thumbnail strip. Clear the pile before the next idea. Leaving every panel on screen makes the edit harder to understand.
3 Zoom the actual footage on the words
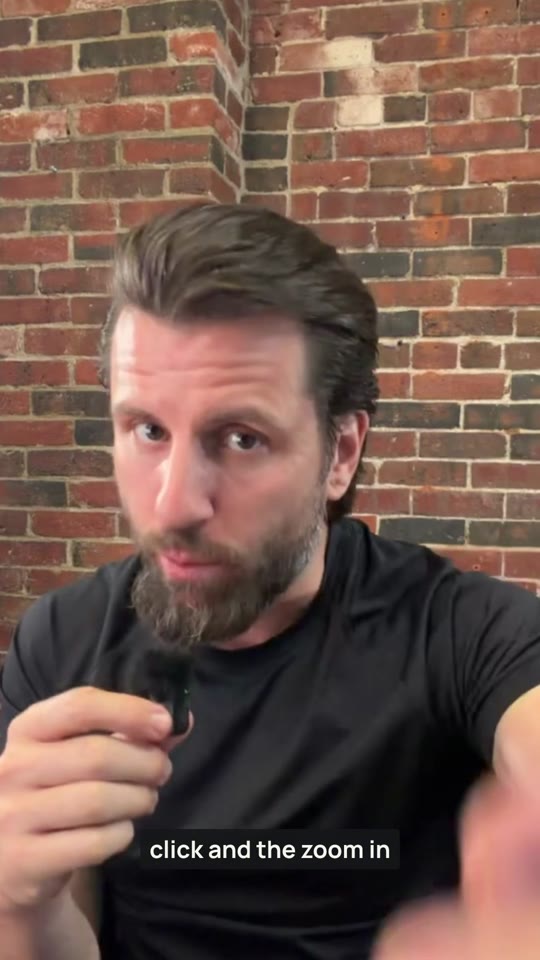
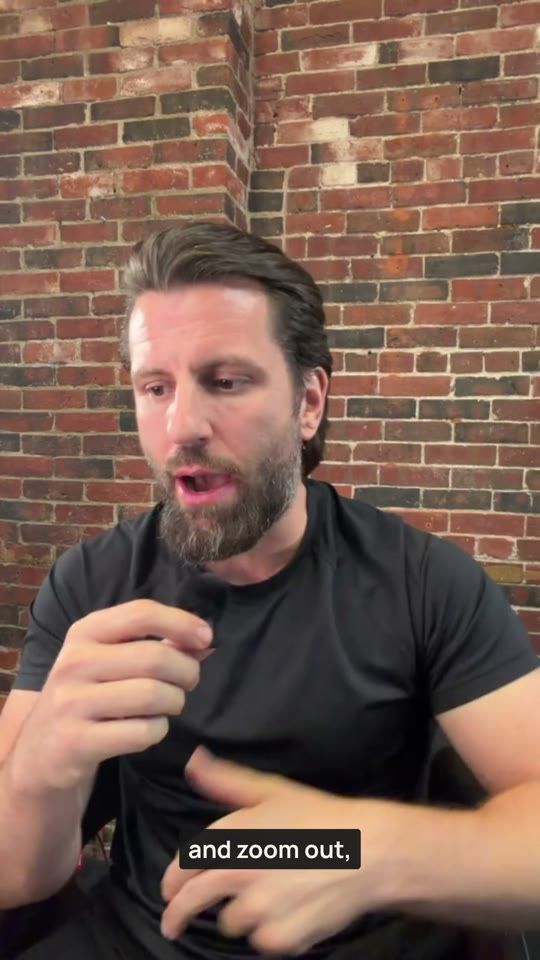
At 10.12 seconds, the speaker says “zoom in.” The footage moves from 100% to 130%. At 10.82 seconds, “zoom out” returns it to 100%. Keep the face as the visual anchor. A useful starting point is a 0.25–0.40-second eased move; shorten or lengthen it to fit the delivery. Captions remain stable.
4 Prove the improvement with the same moment
Play the raw excerpt first. Replace it with the actual finished edit of that excerpt in the same frame. Preserve the source start and playback speed. Label the states “RAW VERSION” and “EDITED VERSION.” Render the finished opening first and reuse that result, so the comparison shows the edit viewers are actually watching.
5 Cut the repeated explanation before decorating it
In the previous 58-second version, the requested cut was roughly 00:34 to 00:45. The final boundary became 00:34.00 to 00:44.36 to preserve the complete next sentence. That removed about 10.36 seconds. The three-hour claim and clock were removed with the speech.
The picture uses a relevant Zoe cutaway to bridge the jump. At another join, the incoming audio starts 30 milliseconds before the picture to keep the start of “But.” That is an example of adjusting the sound independently from the image, not a universal preset. Inspect every join. A tiny fade cannot fix a missing syllable.
For a new edit, start a subtle transition sound just before the visual change and let it decay after the change. Keep it below the voice. If the join still feels rough without the sound effect, fix the cut itself.
6 Turn the call to action into an Instagram interaction
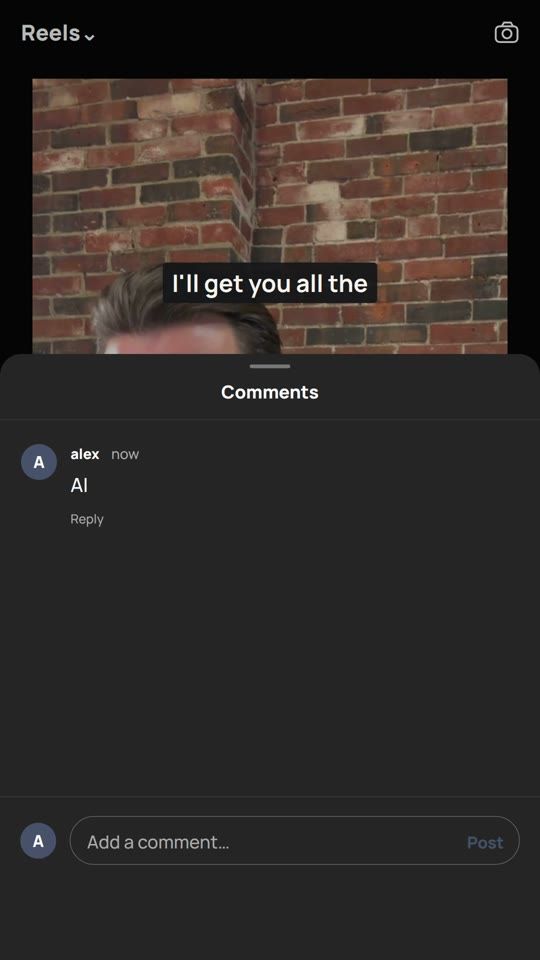
At about 38.12 seconds, “comment AI below” triggers the Reel view. The same moving footage shrinks into Instagram-style controls on @jimmymackin. A separate viewer opens comments, types AI and presses Post. The sheet shows the posted comment before the interface clears.
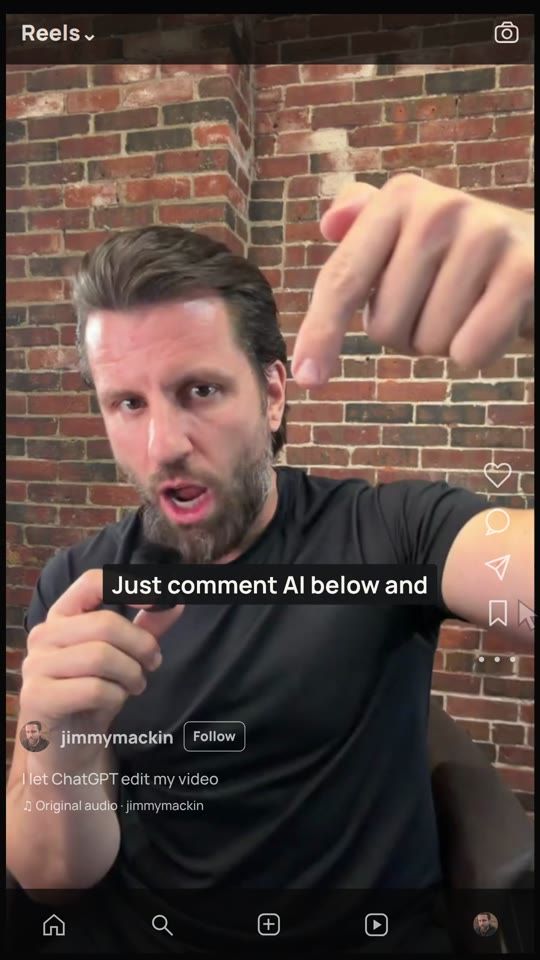
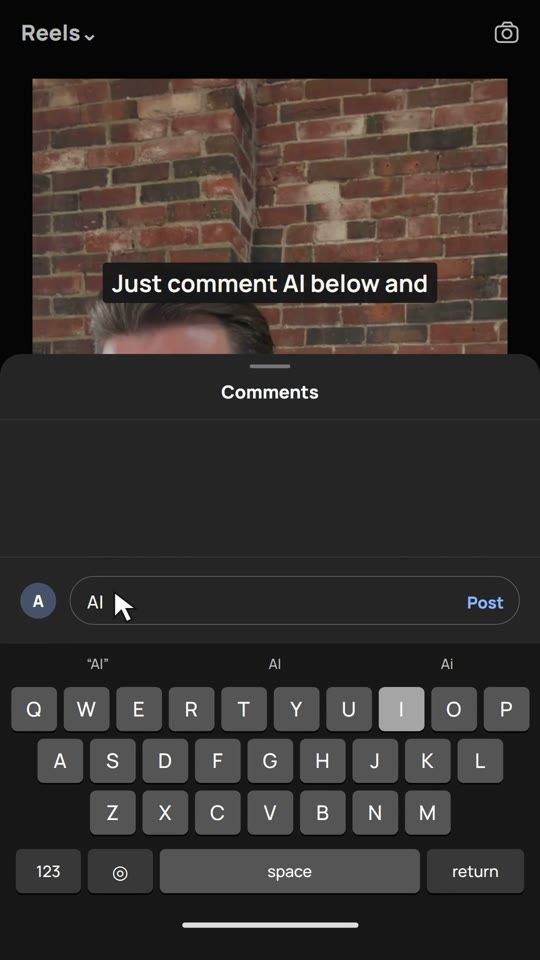
Match the interface’s small details: profile placement, icon spacing, rounded comment sheet, drag handle, input field, keyboard, blue Post control and the submitted state. Leave enough time for people to follow each action. For the closest visual match, supply a screen recording of the real interaction as a timing and layout reference.
This video uses a reconstructed demonstration, not a live Instagram comment. The account owner and commenter are different. Do not invent engagement counts or imply that a simulated interaction actually happened.
7 End on the speaker
At about 41.51 seconds, the interface leaves and the last six seconds play as a clean talking-head close. Keep accurate captions, but remove panels, cursors and keyboards. Let the final sentence finish.
Settings and timing to hand the editor
| Item | Starting specification |
|---|---|
| Canvas | 1080 × 1920 pixels, portrait 9:16, 30 frames per second. |
| Delivery | MP4 with H.264 picture and AAC audio; separate cover, SRT and editable source. |
| Text system | One headline font, one readable sans serif, one accent color. No font changes between scenes. |
| Captions | Usually 3–6 words per phrase, at most two lines. Start around 44–54 pixels at 1080 width, then check on a phone. Break at sentence boundaries. |
| Placement | Use at least 60 pixels of side breathing room as a design starting point. Reserve extra room for platform controls. Move captions when a comment sheet opens; verify in the actual upload preview. |
| Transitions | Start with 0.25–0.45-second eased moves. Use a motivated cutaway for large picture jumps. Avoid a dissolve between mismatched face positions. |
| Sound | Voice first. Effects tied to visible actions. Measure the encoded export, not just the timeline. This export needed a final 3 dB reduction; do not apply that blindly to every video. |
| Cover | “Instagram Edits vs. ChatGPT.” No headshot. Large type, clear contrast and very little small text. |
These are project settings and suggested starting points, not Instagram’s official safe-zone or loudness requirements.
| Final edit time | Purpose | What appears |
|---|---|---|
| 00:00–00:03.8 | Hook | Headline, speaker and upload demonstration. |
| About 00:03.9–00:10 | Problem | Edits with the correct footage, stacking controls and clicks. |
| 00:10.12 / 00:10.82 | Demonstrate | Actual footage zooms in, then out. |
| About 00:13.45–00:24 | Credit and method | Zoe reference, real GitHub screenshot and prompt beat. |
| About 00:24.05–00:31.07 | Proof | Raw excerpt followed by its actual finished edit. |
| 00:34 | Shortened join | Jump to the complete “So I did this…” sentence. |
| About 00:38.12–00:41.51 | Action | Reel, comments, keyboard, AI and Post. |
| About 00:41.51–00:47.77 | Close | Continuous speaker and captions. |
Fix the cause of a weak edit
Use the matching instruction below. Keep feedback tied to a timestamp and a visible or audible result.
The cut sounds clipped or rushed
Ask: “Inspect two seconds on either side of this join. Preserve the complete last word and the next word’s onset. Move the cut to the pause. If needed, let the incoming audio start slightly before the picture changes. Show me this join with sound.”
Avoid putting a fixed crossfade across every cut. Overlapping two spoken phrases can make the problem worse.
The cut looks like a sudden jump
Ask: “Keep the clean speech cut. Bridge the picture change with the relevant screen or reference we are discussing, then return to the speaker. Keep head size and position consistent at the return.”
A cutaway means briefly showing something relevant while the voice continues. In this example, the Zoe reference covers the transition into the credited strategy.
The interface feels fake
Ask: “Match the supplied screen recording. Keep the control positions, text sizes, keyboard and sheet motion consistent. The pointer must land on a real control before it changes. Remove decorative ripples and oversized buttons. Let the submitted comment remain visible long enough to read.”
Check the order: see the Reel → open comments → focus the input → keyboard appears → type → press Post → comment appears. Do not skip straight from a floating cursor to a finished comment.
The wrong person appears in the editor
Ask: “Replace the preview and every visible timeline thumbnail with RAW_SOURCE. Preserve the interface chrome. Do not use a stock screenshot’s built-in sample video.”
Inspect the first unobstructed frame and the frames between overlapping panels. A control stack can hide a wrong source until late in the edit.
The comparison does not feel convincing
Ask: “Use the identical source range at the same speed and crop container. Play raw first. Replace it with the actual rendered edit of that moment. Label the states. Do not choose a weaker take for the raw example.”
For visual comparison under continuing narration, mute the inset clip to avoid double speech. If you want to compare sound too, give each excerpt its own brief listening window.
The captions compete with the interface
Ask: “Keep captions attached to the meaning, not to one fixed screen position. Move them above the comment sheet while it is open. Break at phrases and sentence endings. Do not leave a caption like ‘me. So’ across a cut.”
Check text at normal phone size. Desktop readability is not enough.
There is no sound or the clicks are too loud
Ask: “Inspect the downloaded MP4, not only the preview. Confirm it contains an audio stream and non-silent speech. Check click timing and final encoded peaks. Keep effects below the voice and correct any clipping before delivery.”
Our final file required a small gain reduction after encoding. The right amount depends on the recording and mix.
The ending feels busy
Ask: “Complete the comment interaction before the closing sentence. Remove the sheet, keyboard, cursor and extra graphics together. Return to one continuous speaker shot with captions.”
Do not add a second end card that repeats the CTA unless it gives the viewer useful time to act.
References and what to use them for
- HyperFrames repository: installation, supported agent workflow and rendering documentation. Use the current instructions when starting a new project.
- HyperFrames documentation: technical reference for the editing agent. Readers do not need to learn HTML to use the brief.
- Zoe on Instagram: the creator credited in Jimmy’s recording and the visual reference that inspired the comparison. Use supplied captures if the profile cannot be accessed.
- Jimmy Mackin on Instagram: the account shown in the comment demonstration. Replace it with your own account in a new video.
- Frames embedded in this guide: direct extracts from our final edit, showing the actual implementation. The interface sequences are demonstrations. The typography, timing and layout are the reusable references.
Optional technical handoff for an editor
The source project keeps video, audio, captions and motion editable. The raw-to-edited segment reuses a separately rendered opening. All fonts and media should travel with the project.
Confirm the source file and its duration.
Transcribe and mark word boundaries.
Choose cuts before designing scenes.
Map every retained source range to its final timeline range.
Build and render the opening excerpt.
Reuse that exact excerpt in the comparison.
Build the interface scenes with the correct video and thumbnails.
Time cursor, control response and click sound together.
Render short motion previews at the risky joins.
Check the final exported audio and picture.
Package all local assets and instructions.
Our normalized working source was 68.24 seconds. Retained picture ranges were 0–19.34, 27.40–42.06 and 54.50–68.24 seconds. These refer to this project’s working source, not an arbitrary camera file. Never reuse them without checking the new recording.